背景
しばらく使っていなかったtwitterをブログの記事更新の告知に使おうと思って投稿してみました。自分のツイートを見てみると、twitterカードがうまく表示できていませんでした。titleやdescriptionはデフォルトである程度設定してくれているようです。なのでtwitterカードのカスタマイズを行おうと思います。
headタグがあるpartialを探す
OGP関連の記述はheadタグ内にあります。headタグはどのpartialで記述されているのでしょうか。とりあえずthemesディレクトリ配下をgrepしてみました。
1
2
3
4
5
6
7
8
9
10
11
12
| $ grep -R twitter themes
themes/landscape/layout/_partial/head.ejs: <%- open_graph({twitter_id: theme.twitter, google_plus: theme.google_plus, fb_admins: theme.fb_admins, fb_app_id: theme.fb_app_id}) %>
themes/landscape/source/css/_variables.styl:color-twitter = #00aced
themes/landscape/source/css/_partial/article.styl:.article-share-twitter
themes/landscape/source/css/_partial/article.styl: background: color-twitter
themes/landscape/source/css/_partial/article.styl: text-shadow: 0 1px darken(color-twitter, 20%)
Binary file themes/landscape/source/css/fonts/FontAwesome.otf matches
Binary file themes/landscape/source/css/fonts/fontawesome-webfont.ttf matches
themes/landscape/source/js/script.js: '<a href="https://twitter.com/intent/tweet?url=' + encodedUrl + '" class="article-share-twitter" target="_blank" title="Twitter"></a>',
themes/landscape/README.md:twitter:
themes/landscape/README.md:- **twitter** - Twiiter ID
themes/landscape/_config.yml:twitter:
|
最初に見つかったtheme/landscape/layout/_partial/head.ejsがそれっぽいですね。中身を確認してみます。
1
2
3
4
5
6
| 23 <title><% if (title){ %><%= title %> | <% } %><%= config.title %></title>
24 <meta name="viewport" content="width=device-width, initial-scale=1, maximum-scale=1">
25 <%- open_graph({twitter_id: theme.twitter, google_plus: theme.google_plus, fb_admins: theme.fb_admins, fb_app_id: theme.fb_app_id}) %>
26 <% if (theme.rss){ %>
27 <link rel="alternate" href="<%= url_for(theme.rss) %>" title="<%= config.title %>" type="application/atom+xml">
28 <% } %>
|
実際に出力されるHTMLを見ると、25行目の1行でOGP関連のタグを全て出力していることがわかります。カスタマイズするにはopen_graphというヘルパメソッド?がなにをしているのかを理解する必要がありそうです。メソッドがどこで定義されているかを確認します。
open_graphメソッド
open_graphメソッドはどこで定義されているかを確認します。
hexoアプリケーションのTOPでgrepしてみます。
1
2
3
| $ grep -R open_graph .
./themes/landscape/layout/_partial/head.ejs: <%- open_graph({twitter_id: theme.twitter, google_plus: theme.google_plus, fb_admins: theme.fb_admins, fb_app_id: theme.fb_app_id, twitter_card: 'summary_large_image', image: '/css/images/banner.jpg', twitter_site: '@motoa'}) %>
./node_modules/hexo/lib/plugins/helper/index.js: helper.register('open_graph', require('./open_graph'));
|
1行目は先ほどのpartialですね。2行目が定義箇所っぽいですね。該当のファイルの中身を見てみます。
1
2
3
4
5
6
| 43 helper.register('list_tags', require('./list_tags'));
44 helper.register('list_posts', require('./list_posts'));
45
46 helper.register('open_graph', require('./open_graph'));
47
48 helper.register('number_format', require('./number_format'));
|
正確には理解できてないですが、open_graphというhelperを登録しているような感じでしょうか。helperの処理はrequire('./open_graph')の戻り値なのでしょう。同じディレクトリにあるopen_graph.jsを見てみます。
1
2
3
4
5
6
7
8
9
10
11
12
13
14
15
16
17
18
19
20
| 118 result += meta('twitter:card', twitterCard);
119 result += meta('twitter:title', title);
120 if (description) {
121 result += meta('twitter:description', description, false);
122 }
123
124 if (images.length) {
125 result += meta('twitter:image', images[0], false);
126 }
127
128 if (options.twitter_id) {
129 let twitterId = options.twitter_id;
130 if (twitterId[0] !== '@') twitterId = `@${twitterId}`;
131
132 result += meta('twitter:creator', twitterId);
133 }
134
135 if (options.twitter_site) {
136 result += meta('twitter:site', options.twitter_site, false);
137 }
|
twitter関連の設定をしている箇所はこんな感じでした。twitterカードの種類(summary, summary_large_image)の設定はtwitterCardという変数で設定されているようです。twitterCardという変数はどこで定義されているのか確認します。
1
| 42 const twitterCard = options.twitter_card || 'summary';
|
変数ではなく定数でした。options.twitter_cardが指定されていればそれを、指定されていなければsummaryになるということですね。デフォルトはsummaryになるので、なにも設定していない現在はsummaryになっています。
では、optionsを確認します。
1
| 30 function openGraphHelper(options = {}) {
|
optionsはこの関数の引数でした。ということは、open_graphメソッドの引数のハッシュにtwitter_cardというキーでtwitterカードの種類を設定すればできそうですね。
試してみる
theme/landscape/layout/_partial/head.ejsのopen_graphの呼び出しを以下のように変更してみます。
1
| <%- open_graph({twitter_id: theme.twitter, google_plus: theme.google_plus, fb_admins: theme.fb_admins, fb_app_id: theme.fb_app_id, twitter_card: 'summary_large_image', image: '/css/images/banner.jpg'}) %>
|
twitter_cardをsummary_large_imageに指定しました。またその際に表示する画像をimageで指定しています。今回は試しにキービジュアルの画像を指定しています。
確認
twitter card validatorを利用します。TOPページのURLを入力し、Preview cardをクリックします。
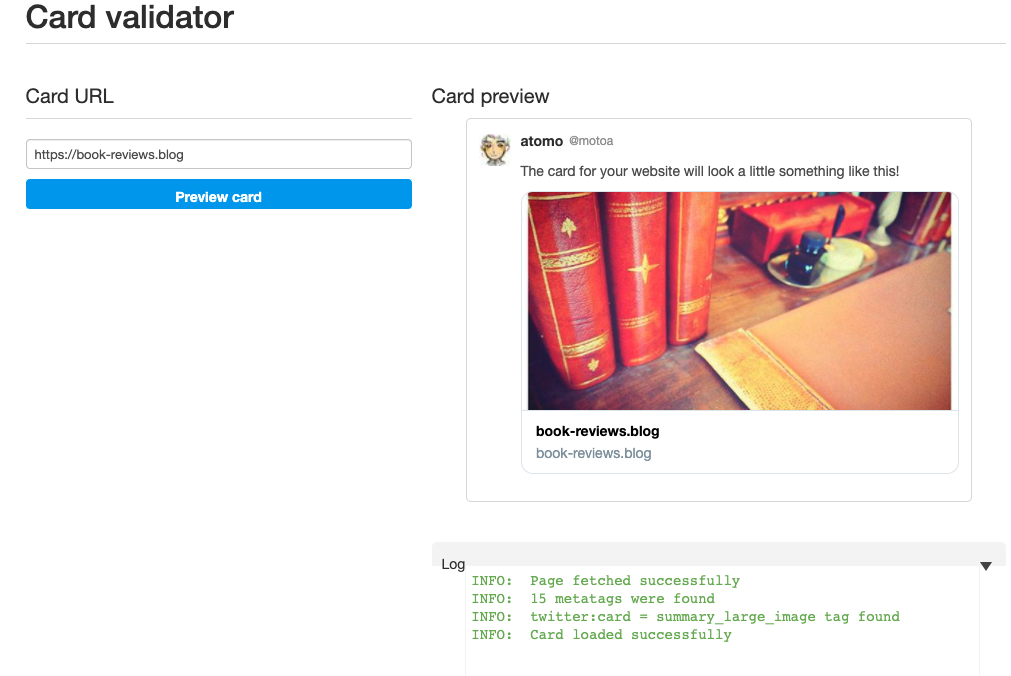
summary_large_imageで表示できました!
まとめ
hexoのOGP関連の設定をカスタマイズしてみました。今回の設定だと全てのtwitter:imageがキービジュアルの画像になってしまうので、次回は記事ごとにtwitter:imageを変更できるようにしてみたいと思います。