docker-composeでDjango+MySQLの環境を構築する

背景

前回の記事で使用するプログラミング言語としてPythonが選ばれやすいというお話をしました。

Pythonで利用できるWebフレームワークとして、二つの候補があります。flaskDjangoです。

軽量なフレームワークが良いか、フルスタックのフレームワークが良いか、という議論はあると思いますが、わたしはRailsに慣れているということ、また、10年くらい前にDjangoを利用していたこともあって、Djangoを採用したいと思います。

まずはローカル開発環境を整えようと思い、docker composeを利用してローカル開発環境を構築するところから始めようと思います。

docker composeを利用した例

Django docker composeと検索すると、クィックスタート: Compose と Djangoというページがヒットします。

これはありがたいと思って見てみると、データベースがpostgreSQLという点以外は探していた情報とマッチします。この情報を元にデータベースをpostgreSQLからMySQLに変更してみようと思います。

MySQLコンテナの設定

先ほどのページに載っていたdocker-compose.ymlは以下のようになっていました

1
2
3
4
5
6
7
8
9
10
11
12
13
14
version: '3'

services:
db:
image: postgres
web:
build: .
command: python3 manage.py runserver 0.0.0.0:8000
volumes:
- .:/code
ports:
- "8000:8000"
depends_on:
- db

dbをMySQLに変更してみます。

1
2
3
4
5
6
7
8
9
10
11
12
13
14
15
16
17
18
19
20
21
22
23
24
25
26
27
version: '3'

services:
db:
image: mysql:5.7
environment:
MYSQL_ROOT_PASSWORD: root
MYSQL_USER: 'django'
MYSQL_PASSWORD: 'django'
MYSQL_DATABASE: 'django'
ports:
- 3306:3306
volumes:
- mysql:/var/lib/mysql
web:
build: .
command: python3 manage.py runserver 0.0.0.0:8000
volumes:
- .:/code
ports:
- "8000:8000"
links:
- db

volumes:
mysql:
driver: local

MySQLコンテナの設定についてはdockerhubのサイトをご確認ください。

ここではdjangoユーザーを作成し、パスワードをdjangoに設定、djangoというデータベースを作成しました。

次にDjango側のデータベース接続設定を行います。

Djangoのデータベース接続設定

Djangoのデータベース接続設定を探します。今回はひながた生成の手順に沿って行っていきます。

プロジェクトの作成

以下のコマンドで作成します

1
docker-compose run web django-admin.py startproject composeexample .

composeexampleが作成できました。

データベース設定ファイルの確認

データベース設定ファイルはcomposeexample/settings.pyに記載されていました。

1
2
3
4
5
6
7
8
9
10
11
12
# Database
# https://docs.djangoproject.com/en/3.2/ref/settings/#databases

DATABASES = {
'default': {
'ENGINE': 'django.db.backends.postgresql',
'NAME': 'postgres',
'USER': 'postgres',
'HOST': 'db',
'PORT': 5432,
}
}

postgreSQLの設定になっているので、MySQLの設定に修正します。

1
2
3
4
5
6
7
8
9
10
DATABASES = {
'default': {
'ENGINE': 'django.db.backends.mysql',
'NAME': 'django',
'USER': 'django',
'PASSWORD': 'django',
'HOST': 'db',
'PORT': 3306,
}
}

先ほどMySQLコンテナに設定した内容をsettings.pyに反映しました。

起動確認

docker-compose upで起動してみます。

1
2
3
4
5
6
7
8
9
10
11
12
13
14
15
16
$ docker-compose up
Starting django_db_1 ... done
Starting django_web_1 ... done
Attaching to django_db_1, django_web_1
(中略)
web_1 | Watching for file changes with StatReloader
web_1 | Performing system checks...
web_1 |
web_1 | System check identified no issues (0 silenced).
web_1 |
web_1 | You have 18 unapplied migration(s). Your project may not work properly until you apply the migrations for app(s): admin, auth, contenttypes, sessions.
web_1 | Run 'python manage.py migrate' to apply them.
web_1 | June 24, 2021 - 12:27:25
web_1 | Django version 3.2.4, using settings 'composeexample.settings'
web_1 | Starting development server at http://0.0.0.0:8000/
web_1 | Quit the server with CONTROL-C.

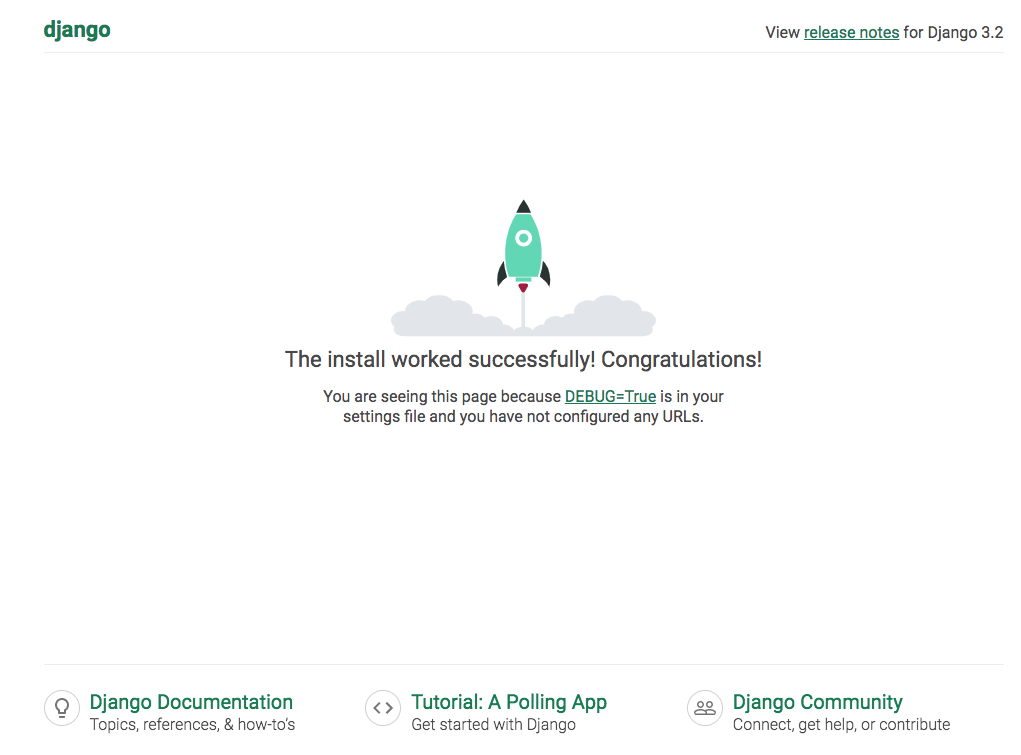
http://localhost:8000にアクセスします。

ローカル開発環境でのtopページ

無事確認できました。

まとめ

Django+MySQLのローカル開発環境をdocker composeで作成することができました。

Macで実行しているので、docker-syncを用いてローカルのソースコードの同期をスムーズに行ってみようと思います。

おまけ

Django起動時のメッセージをよく読むと

1
2
web_1  | You have 18 unapplied migration(s). Your project may not work properly until you apply the migrations for app(s): admin, auth, contenttypes, sessions.
web_1 | Run 'python manage.py migrate' to apply them.

とありましたので、マイグレーションしてみます。

1
2
3
4
5
6
7
8
9
10
11
12
13
14
15
16
17
18
19
20
21
22
23
24
$ docker-compose run --rm web python manage.py migrate
Starting django_db_1 ... done
Creating django_web_run ... done
Operations to perform:
Apply all migrations: admin, auth, contenttypes, sessions
Running migrations:
Applying contenttypes.0001_initial... OK
Applying auth.0001_initial... OK
Applying admin.0001_initial... OK
Applying admin.0002_logentry_remove_auto_add... OK
Applying admin.0003_logentry_add_action_flag_choices... OK
Applying contenttypes.0002_remove_content_type_name... OK
Applying auth.0002_alter_permission_name_max_length... OK
Applying auth.0003_alter_user_email_max_length... OK
Applying auth.0004_alter_user_username_opts... OK
Applying auth.0005_alter_user_last_login_null... OK
Applying auth.0006_require_contenttypes_0002... OK
Applying auth.0007_alter_validators_add_error_messages... OK
Applying auth.0008_alter_user_username_max_length... OK
Applying auth.0009_alter_user_last_name_max_length... OK
Applying auth.0010_alter_group_name_max_length... OK
Applying auth.0011_update_proxy_permissions... OK
Applying auth.0012_alter_user_first_name_max_length... OK
Applying sessions.0001_initial... OK

マイグレーションが完了しました。

docker-compose upしたときのメッセージも確認します

1
2
3
4
5
6
7
8
web_1  | Watching for file changes with StatReloader
web_1 | Performing system checks...
web_1 |
web_1 | System check identified no issues (0 silenced).
web_1 | June 24, 2021 - 12:59:28
web_1 | Django version 3.2.4, using settings 'composeexample.settings'
web_1 | Starting development server at http://0.0.0.0:8000/
web_1 | Quit the server with CONTROL-C.

マイグレーションしてねのメッセージも消えていますね。

参考図書

まもなくDjangoの3.2LTS対応の本が発売されます!出たらすぐ買って読もうと思います!

pyenvを使ってpythonをインストールする

背景

Pythonは周りにかける人が多いので、新しくサービスを開始するときは候補にあがりやすいです。そして、新しくサービスを構築することになり、Python3を採用することになりました(WebフレームワークはDjangoを予定)。

Pythonは10年以上前にやっていましたが、その頃は2.x系で(確か2.6とか2.7だった)3.x系は全くわからない状態です。

とりあえずローカルにインストールしてみようと思います。

anyenvのアップデート

RubyやNode.jsでanyenvを利用していたので、引き続きanyenvを利用してpyenvをインストールしようと思います。

まずはanyenvをアップデートします

1
2
3
4
5
6
7
8
9
10
11
12
13
14
15
16
17
18
19
20
21
22
23
24
25
26
27
28
29
30
31
$ anyenv update
Updating 'anyenv'...
Updating 'anyenv/anyenv-git'...
Updating 'anyenv/anyenv-update'...
Updating 'nodenv'...
Updating 'nodenv/node-build'...
| From https://github.com/nodenv/node-build
| 79b3b885..03dc3d06 master -> origin/master
| * [new tag] v4.9.42 -> v4.9.42
| * [new tag] v4.9.39 -> v4.9.39
| * [new tag] v4.9.40 -> v4.9.40
| * [new tag] v4.9.41 -> v4.9.41
Updating 'nodenv/nodenv-vars'...
Updating 'pyenv'...
| From https://github.com/pyenv/pyenv
| 54e58dc7..f81bffc9 master -> origin/master
| * [new tag] v2.0.1 -> v2.0.1
| * [new tag] 1.2.27 -> 1.2.27
| * [new tag] v2.0.0 -> v2.0.0
| * [new tag] v2.0.0-rc1 -> v2.0.0-rc1
Skipping 'pyenv/python-build'; not git repo
Updating 'rbenv'...
| From https://github.com/rbenv/rbenv
| d604acb..585ed84 master -> origin/master
| * [new branch] rehash-speedup -> origin/rehash-speedup
Updating 'rbenv/ruby-build'...
| From https://github.com/rbenv/ruby-build
| 0bd64d3..19ed806 master -> origin/master
| * [new tag] v20210526 -> v20210526
| * [new tag] v20210510 -> v20210510
Updating 'anyenv manifest directory'...

こちらでanyenvを最新にできました。

Pythonのインストール

インストール可能な一覧を見てみます

1
2
3
4
5
6
7
8
9
10
11
12
13
$ pyenv install -l
Available versions:
2.1.3
2.2.3
2.3.7
(中略)
3.9.3
3.9.4
3.9.5
3.10.0b2
3.10-dev
3.11-dev
...

最新は3.9.5のようですね、こちらをインストールしましょう

1
2
3
4
5
6
7
8
9
10
11
12
$ pyenv install 3.9.5
Downloading openssl-1.1.1k.tar.gz...
-> https://www.openssl.org/source/openssl-1.1.1k.tar.gz
Installing openssl-1.1.1k...
Installed openssl-1.1.1k to /Users/user/.anyenv/envs/pyenv/versions/3.9.5

python-build: use readline from homebrew
Downloading Python-3.9.5.tar.xz...
-> https://www.python.org/ftp/python/3.9.5/Python-3.9.5.tar.xz
Installing Python-3.9.5...
python-build: use readline from homebrew
Installed Python-3.9.5 to /Users/user/.anyenv/envs/pyenv/versions/3.9.5

インストールできました

pyenvを利用するための設定

次に.bash_profileに以下の設定を追記します

1
2
3
export PYENV_ROOT="$HOME/.anyenv/envs/pyenv"
export PATH="$PYENV_ROOT/bin:$PATH"
eval "$(pyenv init --path)"

この設定を行わないと

1
2
WARNING: `pyenv init -` no longer sets PATH.
Run `pyenv init` to see the necessary changes to make to your configuration.

というエラーが出て、pyenvではないpython(/usr/bin/python)が呼ばれてしまいます…

詳しい設定についてはメッセージにある通りpyenv initを実行すると表示できます

1
2
3
4
5
6
7
8
9
10
11
12
13
14
15
16
17
18
19
20
21
22
23
24
25
26
27
28
29
$ pyenv init

# (The below instructions are intended for common
# shell setups. See the README for more guidance
# if they don't apply and/or don't work for you.)

# Add pyenv executable to PATH and
# enable shims by adding the following
# to ~/.profile:

export PYENV_ROOT="$HOME/.pyenv"
export PATH="$PYENV_ROOT/bin:$PATH"
eval "$(pyenv init --path)"

# If your ~/.profile sources ~/.bashrc,
# the lines need to be inserted before the part
# that does that. See the README for another option.

# If you have ~/.bash_profile, make sure that it
# also executes the above lines -- e.g. by
# copying them there or by sourcing ~/.profile

# Load pyenv into the shell by adding
# the following to ~/.bashrc:

eval "$(pyenv init -)"

# Make sure to restart your entire logon session
# for changes to profile files to take effect.

anyenvを利用しているためPATHが少し違いますので注意が必要です。

動作確認

早速動作確認をしてみます

1
2
3
4
5
6
7
$ python
Python 3.7.9 (default, Nov 16 2020, 18:18:20)
[Clang 10.0.0 (clang-1000.10.44.4)] on darwin
Type "help", "copyright", "credits" or "license" for more information.
>>> exit
Use exit() or Ctrl-D (i.e. EOF) to exit
>>> $

想定しているバージョンでないPythonが起動しました…(しかも終了のコマンドを間違えています)

バージョンの指定をしてなかったことに気がつきました。このディレクトリでは3.9.5を利用するように設定します。

1
2
3
4
5
6
7
8
9
10
$ ls -a
. ..
$ pyenv local 3.9.5
$ ls -a
. .. .python-version
$ python
Python 3.9.5 (default, Jun 8 2021, 23:01:54)
[Clang 10.0.0 (clang-1000.10.44.4)] on darwin
Type "help", "copyright", "credits" or "license" for more information.
>>>

無事3.9.5が起動しました。

まとめ

anyenv経由でpyenvを利用しPython3をインストールしました。(venvというmのもあるみたいです)

これからはパッケージ管理システムpipを学び、その後dockerでローカル開発環境を構築していきます

※ Python3勉強用に入門 Python3 第2版を購入しました。

BigQueryのスキーマを変更する

背景

BigQueryでカラムを追加してほしいという依頼がきました。重要なカラムのようで、今までのデータは不要というレアなケースです。ですので、一度データセットを消しますが、スキーマ変更では一般的ではないと思いますので、後ほどデータを消さないスキーマ変更の方法についても調べてみようと思います。

スキーマの変更

既存スキーマの取得

まず既存のスキーマを取得します。

1
2
3
4
5
6
7
8
9
10
11
12
13
14
$ bq show --schema --format=prettyjson project_name:dataset_name.table_name
[
{
"mode": "REQUIRED",
"name": "id",
"type": "STRING"
},
{
"mode": "REQUIRED",
"name": "hostname",
"type": "STRING"
},
...
]

ファイル出力する場合はリダイレクトします。

1
$ bq show --schema --format=prettyjson project_name:dataset_name.table_name > schema.json

テーブルの削除

既存のスキーマを保存したのでテーブルを削除します

1
2
3
4
5
6
7
8
$ bq rm project_name:dataset_name.table_name


Updates are available for some Cloud SDK components. To install them,
please run:
$ gcloud components update

rm: remove table 'project_name:dataset_name.table_name' (y/N)

yを入力してエンターキーを押すと削除できます

スキーマの変更

先ほど保存したスキーマのファイルを変更します。追加したいカラムを追記します。

1
2
3
4
5
6
7
8
$ git diff schema.json
},
+ {
+ "mode": "NULLABLE",
+ "name": "additional_id",
+ "type": "STRING"
+ },
{

追記したらこのスキーマファイルを使ってテーブルを作成します。

作成していたテーブルは以前の記事のBigQueryで時間単位の列でのパーティション分割テーブルを作成するで作成したパーティション分割テーブルなので --time_partitioning_fieldオプションもつけます。

1
2
$ bq mk --table --schema schema.json --time_partitioning_field created_date project_name:dataset_name.table_name
Table 'project_name:dataset_name.table_name' successfully created.

テーブルが作成できました。

データを消さないスキーマ変更

データを消さない(通常の)スキーマ変更の方法はドキュメントに記載があります。

https://cloud.google.com/bigquery/docs/managing-table-schemas

bq updateというコマンドがあるんですね。

1
$ bq update project_id:dataset.table schema.json

schema.jsonを書き換えるだけでOKでした。

おまけ

先ほどテーブル削除時に

1
2
3
Updates are available for some Cloud SDK components.  To install them,
please run:
$ gcloud components update

とメッセージが出ていたので実行しました

1
2
3
4
5
6
7
8
9
10
11
12
13
14
15
16
17
18
19
20
21
22
23
24
25
26
27
28
29
30
31
32
33
34
35
36
37
38
39
40
41
42
43
44
45
46
47
48
49
50
51
52
53
54
55
56
57
58
59
60
61
62
63
64
65
66
67
68
69
70
71
72
73
74
75
76
77
78
79
80
81
$ gcloud components update


Your current Cloud SDK version is: 319.0.0
You will be upgraded to version: 343.0.0

┌─────────────────────────────────────────────────────────────────────────────┐
│ These components will be updated. │
├─────────────────────────────────────────────────────┬────────────┬──────────┤
│ Name │ Version │ Size │
├─────────────────────────────────────────────────────┼────────────┼──────────┤
│ BigQuery Command Line Tool │ 2.0.69 │ < 1 MiB │
│ BigQuery Command Line Tool (Platform Specific) │ 2.0.65 │ < 1 MiB │
│ Cloud SDK Core Libraries │ 2021.05.27 │ 18.8 MiB │
│ Cloud SDK Core Libraries (Platform Specific) │ 2021.03.12 │ < 1 MiB │
│ Cloud Storage Command Line Tool │ 4.62 │ 3.9 MiB │
│ Cloud Storage Command Line Tool (Platform Specific) │ 4.59 │ < 1 MiB │
│ anthoscli │ 0.2.16 │ 47.5 MiB │
│ gcloud cli dependencies │ 2021.05.27 │ 11.0 MiB │
│ gcloud cli dependencies │ 2021.04.16 │ < 1 MiB │
└─────────────────────────────────────────────────────┴────────────┴──────────┘

A lot has changed since your last upgrade. For the latest full release notes,
please visit:
https://cloud.google.com/sdk/release_notes

Do you want to continue (Y/n)? Y

╔════════════════════════════════════════════════════════════╗
╠═ Creating update staging area ═╣
╠════════════════════════════════════════════════════════════╣
╠═ Uninstalling: BigQuery Command Line Tool ═╣
╠════════════════════════════════════════════════════════════╣
╠═ Uninstalling: BigQuery Command Line Tool (Platform Sp... ═╣
╠════════════════════════════════════════════════════════════╣
╠═ Uninstalling: Cloud SDK Core Libraries ═╣
╠════════════════════════════════════════════════════════════╣
╠═ Uninstalling: Cloud SDK Core Libraries (Platform Spec... ═╣
╠════════════════════════════════════════════════════════════╣
╠═ Uninstalling: Cloud Storage Command Line Tool ═╣
╠════════════════════════════════════════════════════════════╣
╠═ Uninstalling: Cloud Storage Command Line Tool (Platfo... ═╣
╠════════════════════════════════════════════════════════════╣
╠═ Uninstalling: anthoscli ═╣
╠════════════════════════════════════════════════════════════╣
╠═ Uninstalling: gcloud cli dependencies ═╣
╠════════════════════════════════════════════════════════════╣
╠═ Uninstalling: gcloud cli dependencies ═╣
╠════════════════════════════════════════════════════════════╣
╠═ Installing: BigQuery Command Line Tool ═╣
╠════════════════════════════════════════════════════════════╣
╠═ Installing: BigQuery Command Line Tool (Platform Spec... ═╣
╠════════════════════════════════════════════════════════════╣
╠═ Installing: Cloud SDK Core Libraries ═╣
╠════════════════════════════════════════════════════════════╣
╠═ Installing: Cloud SDK Core Libraries (Platform Specific) ═╣
╠════════════════════════════════════════════════════════════╣
╠═ Installing: Cloud Storage Command Line Tool ═╣
╠════════════════════════════════════════════════════════════╣
╠═ Installing: Cloud Storage Command Line Tool (Platform... ═╣
╠════════════════════════════════════════════════════════════╣
╠═ Installing: anthoscli ═╣
╠════════════════════════════════════════════════════════════╣
╠═ Installing: gcloud cli dependencies ═╣
╠════════════════════════════════════════════════════════════╣
╠═ Installing: gcloud cli dependencies ═╣
╠════════════════════════════════════════════════════════════╣
╠═ Creating backup and activating new installation ═╣
╚════════════════════════════════════════════════════════════╝

Performing post processing steps...done.

Update done!

To revert your SDK to the previously installed version, you may run:
$ gcloud components update --version 319.0.0


To take a quick anonymous survey, run:
$ gcloud survey

しばらく実行していなかったからか結構バージョン変わってますね。

アップデート後の最後の方に戻し方などが書かれています。便利ですね。

Rails Formオブジェクトまとめ

背景

久しぶりにFormオブジェクトを実装することになりました。いろいろ忘れてしまっていたので、実装に時間がかかってしまいました…次からスムーズにいくようここにまとめておきます。

実装方法

ファイルのパス

ファイルは今までの経験だと app/forms 配下に置くのが一般的となっています。autload_pathsに含まれていれば良いかなと思います。

autoload_pathsについてはこちらを参考にしてください。

必要なクラスのinclude

validationなどを実現するために、クラスをincludeします。
今回はActiveModel::Modelをincludeします。

こちらにあるように、ActiveModel::Modelをincludeすると以下のようなことができるようになります。

  • バリデーション
  • ハッシュでの初期化
  • form_forの利用

この3つはフォームを実装する上で必須の機能になります。

バリデーション

フォームで送信された値の妥当性をチェックするのに必要です。
valid?メソッドを呼び出すことによって、設定したバリデーションを呼び出すことができます。

ハッシュでの初期化

実装したフォームオブジェクトはコントローラで利用します。ハッシュで初期化できるということは、StrongParametersをそのまま渡すことができます。

こちらに記載の例を少し変更して

1
2
3
4
5
6
7
8
9
10
11
12
13
14
15
16
17
18
19
20
21
class PeopleController < ActionController::Base
def new
@person = Person.new
end

def create
@person = Person.new(person_params)
if @person.valid?
@person.save
end
end

private
# 許可するパラメータはprivateメソッドでカプセル化します。
# これは非常によい手法であり、createとupdateの両方で使いまわすことで
# 同じ許可を与えることができます。また、許可する属性をユーザーごとにチェックするよう
# このメソッドを特殊化することもできます。
def person_params
params.require(:person).permit(:name, :age)
end
end

とすることができます。

form_forの利用

viewでフォームを作成する際はform_forを使うと便利です。上記の例を使うと

1
2
3
4
<% form_for @person, url: person_create_path do |f| %>
<%= f.text_field :name %>
<%= f.number_field :age %>
<% end %>

という感じになります。

ここまででほとんど実装できましたね。

翻訳

翻訳はactivemodelをキーにして定義します。

エラーメッセージなどは翻訳させないと項目名がそのまま表示されてしまいます。

まとめ

フォームオブジェクトの作り方をまとめました。ActiveModel::Modelモジュールがとても便利ということですね。

バリデーション、Strong Parameters、form_forを覚えておけばスムーズに実装できると思います。

余談ですが、利用規約の同意などでチェックボックスを使うことがあると思いますが、check_boxのバリデーションは acceptanceです。

validates :agreement, acceptance: { message: '利用規約に同意してください' }

という形式です。presenceではチェックしてなくてもバリデーション通ってしまいます…

※追記 こちらとてもよくまとまっています
https://thoughtbot.com/blog/activemodel-form-objects

remove_columnのrollbackでActiveRecord::IrreversibleMigrationエラーが発生したときの対応方法

背景

Create tableのマイグレーションで追加したカラムが必要なくなったので、remove_columnのマイグレーションを行いました。

マイグレーションファイルはこちら

1
2
3
4
5
class RemoveTitleFromExamples < ActiveRecord::Migration
def change
remove_column :examples, :title
end
end

マイグレーションは成功してtitleというカラムはなくなりました。

ところがやっぱりtitleというカラムが必要ということで、上記で実施したマイグレーションを元に戻そうとしました。すると以下のようにエラーが発生してしまいました…

1
2
3
4
5
6
7
8
9
10
11
$ ./bin/rails db:rollback
StandardError: An error has occurred, all later migrations canceled:

remove_column is only reversible if given a type.

(中略)

Caused by:
ActiveRecord::IrreversibleMigration:

remove_column is only reversible if given a type.

エラーメッセージを見れば対応方法は分かりそうですね

対応方法

エラーメッセージにある

1
remove_column is only reversible if given a type.

が答えですね。型を与えてあげればrollbackが可能ということです。ですので、先ほどのマイグレーションファイルを以下のように変更します。

1
2
3
4
5
class RemoveTitleFromExamples < ActiveRecord::Migration
def change
remove_column :examples, :title, :string
end
end

マイグレーションを実行してみましょう。

1
2
3
4
5
$ ./bin/rails db:rollback
== 20210523211330 RemoveTitleFromExamples: reverting - ===========
-- add_column(:examples, :title, :string)
-> 0.0812s
== 20210523211330 RemoveTitleFromExamples: reverted (0.0845s) - ==

無事追加されました!

ですが、元の位置には追加されておらず、最後に追加されてしまいます…
afterオプションが効くかどうか試してみます。

一旦マイグレーションします。

1
2
3
4
5
$ ./bin/rails db:migrate
== 20210523211330 RemoveTitleFromExamples: migrating - ===========
-- remove_column(:examples, :title, :string)
-> 0.0398s
== 20210523211330 RemoveTitleFromExamples: migrated (0.0399s) - ==

マイグレーションファイルを書き換えます

1
2
3
4
5
class RemoveTitleFromExamples < ActiveRecord::Migration
def change
remove_column :examples, :title, :string, after: :id
end
end

rollbackします

1
2
3
4
5
$ ./bin/rails db:rollback
== 20210523211330 RemoveTitleFromExamples: reverting - ===========
-- add_column(:examples, :title, :string, {:after=>:id})
-> 0.0489s
== 20210523211330 RemoveTitleFromExamples: reverted (0.0522s) - ==

テーブルを確認すると、ちゃんと指定したカラムの後に追加されています!

最後に、カラム削除用に作成したマイグレーションのファイルを削除して完了です。

Reactで 'this' is not allowed before 'super()'

背景

React.js&Next.js超入門第2版を読みながらサンプルを試していると、突然

1
2
3
4
5
6
7
8
9
10
11
12
13
14
src/Rect.js
Line 12:5: 'this' is not allowed before 'super()' no-this-before-super
Line 13:5: 'this' is not allowed before 'super()' no-this-before-super
Line 14:5: 'this' is not allowed before 'super()' no-this-before-super
Line 15:5: 'this' is not allowed before 'super()' no-this-before-super
Line 16:5: 'this' is not allowed before 'super()' no-this-before-super
Line 17:5: 'this' is not allowed before 'super()' no-this-before-super
Line 18:5: 'this' is not allowed before 'super()' no-this-before-super
Line 19:24: 'this' is not allowed before 'super()' no-this-before-super
Line 21:13: 'this' is not allowed before 'super()' no-this-before-super
Line 22:12: 'this' is not allowed before 'super()' no-this-before-super
Line 23:14: 'this' is not allowed before 'super()' no-this-before-super
Line 24:15: 'this' is not allowed before 'super()' no-this-before-super
Line 25:21: 'this' is not allowed before 'super()' no-this-before-super

とエラーが出てしまった。

エラーが起こったコード

エラーが起こったコードはこちら

1
2
3
4
5
6
7
8
9
10
11
12
13
14
15
16
17
constructor(props) {
this.x = props.x
this.y = props.y
this.width = props.w
this.height = props.h
this.color = props.c
this.radius = props.r
this.style = {
backgroundColor: this.color,
position: "absolute",
left: this.x + "px",
top: this.y + "px",
width: this.width + "px",
height: this.height + "px",
borderRadius: this.radius + "px"
}
}

原因

原因はエラーメッセージにある通り、super()を呼び出す前にthisを使ってはいけないということ。

修正後のコードはこちら

1
2
3
4
5
6
7
8
9
10
11
12
13
14
15
16
17
18
constructor(props) {
super(props)
this.x = props.x
this.y = props.y
this.width = props.w
this.height = props.h
this.color = props.c
this.radius = props.r
this.style = {
backgroundColor: this.color,
position: "absolute",
left: this.x + "px",
top: this.y + "px",
width: this.width + "px",
height: this.height + "px",
borderRadius: this.radius + "px"
}
}

thisを参照する前にsuperを呼べば問題ありません。

そして、Reactの話ではなく、ES6の話でした。
https://eslint.org/docs/rules/no-this-before-super

まとめ

ES6をちゃんと理解できていないので、問題の所在も怪しかった(React云々の話ではない)。ちゃんと学んでいきます。

参考図書

React.js&Next.js超入門第2版

Githubで認証が失敗するときの対応方法

背景

会社PCで会社のGithubのアカウントを利用していました。会社PCに個人開発用のアカウントのリポジトリを作成しようとしたところ、認証が失敗してしまいました。

1
fatal: Authentication failed for リモートURL

検索結果に表示された解決策

ググってみると、だいたい同じような回答が書いてありました。

remote.origin.urlが間違っているから、git config remote.origin.urlで正しい値に設定してね

というものばかりでした。実際にリポジトリのURLを正しく設定しても認証エラーは改善されません。

解決方法

自分の場合はremote.origin.urlにユーザー名を指定することで解決しました。

1
git config remote.origin.url https://username@github.com/username/repository.git

このusername@をつけることで認証成功しました。

まとめ

2021年8月13日でパスワード認証が無効になってしまいます。

https://github.blog/2020-12-15-token-authentication-requirements-for-git-operations/

今回はパスワード認証の問題でしたが、次回はパスワード認証をやめる方法を記載したいと思います。

参考図書

Gitで困った時に読む本

SQLで文字列を分割する方法(MySQL)

背景

あるサービスでユーザーはメールアドレスを登録するのですが、そのメールアドレスはどういったドメインが多いのか調べようと思いました。

最初に思いついた方法は、メールアドレスを@で分割して、分割した2つの文字列の2番目がドメインになっていると思うので、それでgroup byするというものでした。

ですが、SQLで文字列を分割する方法を知らなかったので、メモしておきます。

文字列の分割

MySQLにはsubstring_indexという関数があります。
https://dev.mysql.com/doc/refman/5.6/ja/string-functions.html#function_substring-index

substring_indexの引数

substring_index

1
substring_index(分割対象の文字列, 区切り文字, 返す文字列の数)

となっています。

分割対象の文字列と区切り文字については問題ないと思いますが、返す文字列の数はわかりづらいですね。

公式に書いてある例を手元で実行してみます。

1
2
3
4
5
6
7
8
9
10
11
12
13
14
15
mysql> SELECT SUBSTRING_INDEX('www.mysql.com', '.', 2);
+------------------------------------------+
| SUBSTRING_INDEX('www.mysql.com', '.', 2) |
+------------------------------------------+
| www.mysql |
+------------------------------------------+
1 row in set (0.00 sec)

mysql> SELECT SUBSTRING_INDEX('www.mysql.com', '.', -2);
+-------------------------------------------+
| SUBSTRING_INDEX('www.mysql.com', '.', -2) |
+-------------------------------------------+
| mysql.com |
+-------------------------------------------+
1 row in set (0.00 sec)

最初の例はドットで分割して、前から2つなので、www.mysqlが、後ろの例はドットで分割して、-2なので後ろから2つなので、mysql.comが返ってきます。

メールアドレスのドメイン取得

ではメールアドレスのドメインを取得してみようと思います。

1
2
3
4
5
6
7
mysql> SELECT SUBSTRING_INDEX('user@mysql.com', '@', -1);
+--------------------------------------------+
| SUBSTRING_INDEX('user@mysql.com', '@', -1) |
+--------------------------------------------+
| mysql.com |
+--------------------------------------------+
1 row in set (0.00 sec)

できました!

分割文字列の真ん中を取得したい場合

ふと思ったんですが、www.mysql.commysqlのみを取得したい場合はどうするのでしょうか。

1
2
3
4
5
6
7
mysql> SELECT SUBSTRING_INDEX(SUBSTRING_INDEX('www.mysql.com', '.', 2), '.', -1);
+--------------------------------------------------------------------+
| SUBSTRING_INDEX(SUBSTRING_INDEX('www.mysql.com', '.', 2), '.', -1) |
+--------------------------------------------------------------------+
| mysql |
+--------------------------------------------------------------------+
1 row in set (0.00 sec)

こうかな?と思ったんですが、ちょっと煩雑ですね…

メールアドレスのドメインで集計

以上のことがわかったので、集計するクエリを書いてみます

1
2
3
4
5
6
7
8
SELECT
SUBSTRING_INDEX(email, '@', -1) as domain,
COUNT(*)
FROM
users
GROUP BY
domain
;

無事できました。

まとめ

MySQLで文字列を分割する方法を紹介しました。今回の関数はMySQL独自のものですが、その他のプラットフォームでも同じような関数はあると思います。

文字列を操作して、クエリを実行できると集計できる幅も広がりそうですね。久々SQLを書いたのですが、分析は楽しいですね!

yumで [Errno 14] PYCURL ERROR 22 - 'The requested URL returned error 404 Not Found' が表示された時の対応

背景

昔から動いているScientific Linuxにパッケージをインストールしたいと相談を受けたので、とりあえずyumコマンドでインストールしようとしたところ、以下のようなメッセージが表示されました

1
http://ftp.scientificlinux.org/linux/scientific/6.5/x86_64/os/repodata/repomd.xml: [Errno 14] PYCURL ERROR 22 - "The requested URL returned error: 404 Not Found"

404となっていたので、リポジトリのURLが変わってしまったのかなと思って調査した内容を記載します。

情報の収集

まず、サーバーの情報を集めます。

ディストリビューションについて

/etc/redhat-releaseを確認します。

1
2
# more /etc/redhat-release
Scientific Linux release 6.5 (Carbon)

リポジトリについて

/etc/yum.repos.d/の下のファイルを確認します。

1
2
3
4
# ls /etc/yum.repos.d/
epel-testing.repo mirrors-rpmforge-extras sl-other.repo
epel.repo mirrors-rpmforge-testing sl.repo
mirrors-rpmforge rpmforge.repo sl6x.repo

試しにyum updateを実行してみます。

1
2
3
4
5
6
7
# yum update
Loaded plugins: fastestmirror, security
Loading mirror speeds from cached hostfile
* sl: ftp.scientificlinux.org
* sl-security: ftp.scientificlinux.org
* sl6x: ftp.scientificlinux.org
* sl6x-security: ftp.scientificlinux.org

以上より、sl, sl-security, sl6x, sl6x-securityのみ有効になっていることがわかります。
それぞれsl.repo, sl6x.repoを修正すればよいことがわかります。

リポジトリのURLの修正

まず、既存のURLを確認します。

エラーになったURLは

1
http://ftp.scientificlinux.org/linux/scientific/6.5/x86_64/os/repodata/repomd.xml

でした。sl.repoでbaseurlが記載されていて

1
baseurl=http://ftp.scientificlinux.org/linux/scientific/$releasever/$basearch/os/

となっていました。なので、一旦http://ftp.scientificlinux.org/linux/scientific/にアクセスしてみます。

すると、バージョンのディレクトリ一覧が表示されました。ここの階層まではディレクトリは存在するようです。しかしバージョンの中には今回の対象である6.5はありませんでした(一番古くても7.0)

バージョン名以外のディレクトリもあったので漁ってみると、obsoleteというディレクトリの下に6.5というディレクトリが存在しました!6.5のディレクトリ内はアーキテクチャの一覧があるので、これでアクセスできそうです!

repoファイルの修正

URLのscientific6.5の間にobsoleteを追加すれば良いので、viで開いて一括置換します。

viで開いた後

1
:%s/\/scientific\//\/scientific\/obsolete\//g

というコマンドで一括置換し、保存します。sl.repo、sl6x.repoに対して行いました。

動作確認

正しくリポジトリにアクセスできるようになったか確認します。

1
2
3
4
5
6
7
8
9
10
11
12
13
14
15
16
17
18
# yum update
Loaded plugins: fastestmirror, security
Loading mirror speeds from cached hostfile
* sl: ftp.scientificlinux.org
* sl-security: ftp.scientificlinux.org
* sl6x: ftp.scientificlinux.org
* sl6x-security: ftp.scientificlinux.org
sl | 3.6 kB 00:00
sl-security | 2.9 kB 00:00
sl6x | 3.7 kB 00:00
sl6x-security | 2.9 kB 00:00
Setting up Update Process
Resolving Dependencies
...
(省略)
...
Is this ok [y/N]: N
Exiting on user Command

無事リポジトリへアクセスできるようになりました。

まとめ

今回は放置されていたサーバーで急な要件が発生して慌てて対応しました。しかし、本来は常日頃からメンテナンスを行い、日々のアップデートに追従していくのが重要だと思います。オンプレならではの問題と思われるかもしれませんが、クラウド移行してもコンテナやマシーンイメージのメンテナンスは重要だと思います。

React Developer Toolsが動作しないときの対処法

背景

React.jsの概要を知りたいと思いReact.js & Next.js超入門 第2版を読みながらたまにサンプルコードを動作させたりしていました。

その本の中で、React Developer Toolsが紹介されていて、Chromeの拡張機能をインストールしました。しかし、利用環境によってはそのままで動作しなかったので、その点について記載します。

React.jsの動作環境

React.jsの動作環境はnpmを用いず、CDN上のreact.development.jsreact-dom.development.jsを読み込むことで実現しました。

VSCodeでhtmlファイルを作成し、React.jsが動作するサンプルコードを記載して、そのファイルをブラウザに読み込ませて動作させていました。なのでURLはfile://で始まっています。

React Developer Toolsが動作しない

サンプルコードをブラウザで表示後、拡張機能のアイコンをクリックしようとしたら、以下のメッセージが表示されました。

1
2
This is a restricted browser page.
React devtools cannot access this page.

ん〜なんでしょうか、ちょっとわからないのでググってみると、stackoverflowに答えが見つかりました。

https://stackoverflow.com/questions/26347489/react-dev-tools-not-loading-in-chrome-browser

1
If you opened a local html file in your browser (file://...) then you must first open chrome extensions and check off "Allow access to file URLs".

設定が必要のようです。

拡張機能の設定

stackoverflowに書いてある通り設定してみます。

  1. Chromeの拡張機能の一覧からReact Developer Toolsをクリック
  2. 設定画面の下の方、ファイルの URL へのアクセスを許可するがオフになっているのでONにする
  3. Chrome Developer Toolsを再起動する

以上になります。

Chrome Developer ToolsのElementsConsoleなどが表示されているところに、ComponentsProfilerが表示されていることが確認できました。Reactのロゴが表示されているのでわかりやすいですね。

まとめ

ファイルのURLはあまり使わないと思いますが、最初に試すときはファイルを読み込ませるのが楽でいいですね。

React Developer Toolsは正しく使うことでReact.jsの理解が捗ると思うので、使い方をちゃんと身に付けたいと思います。